

Introduction:
This is the equipment I recently installed in my 205 1.6 GTi, all from CarAudioDirect: Kenwood MP6090R Head Unit, Kenwood steering wheel remote control (very useful due to extremely low factory location of 205 HU hole) - now replaced with a better Alpine unit, Dragster DA604 60W x 4 RMS in the boot, Alpine SPR-175A 6.5" component speakers up front running from the amp, Infinity 552i co-axials running from head unit for rear fill, JL 12W0 12" subwoofer in the boot in a home-made 1.5 ft3 sealed box (most of the boot!), a powerkit 800 wiring kit. This article aims to explain how I installed my 205 car stereo system, with a few tips and some of the problems I had.
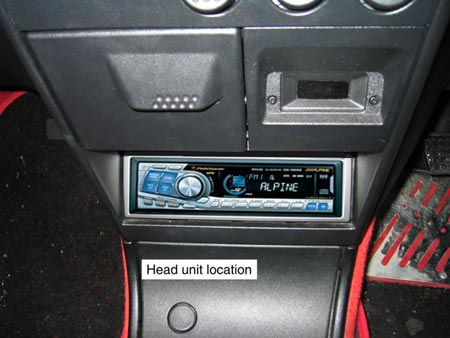
standard headunit location, fitted with Alpine headunit
I have no previous experience with installing car audio equipment, and decided to have a go myself due to the fact that I had no money left to pay anyone from buying the best gear I could afford at the time (highly recommended). A full car audio install isn't as hard as it may first appear, especially in a 205 which is quite an easy car to work on, and the music will sound that much better because of the satisfaction of having done it yourself. This article will not be overly technical, but hopefully provide some good tips from things I have learnt. My first tip is: keep dosed up on good ole mugs of hot sweet tea, and eat lots of food so you don't feel weak when navigating the assault course that is your car. Secondly, don't use 6x9s unless you don't have an amp - they suck! Well a bit harsh maybe, but the sub will kill them off and they will ruin your front soundstage. Plus you'll have to cut a great gash in your parcel shelf (which I had anyway). Don't ruin a perfectly good parcel shelf to put 6x9s in it unless you have to! I have covered the holes with acoustic cloth so scallywags can't see my amp and sub in the boot.
Overview:
The 205 factory speaker locations are 5.25" (13cm) speaker slots in the front and rear, situated in the doors at dashboard level, and above and to either side of the parcel shelf in the rear. However, I wanted more bass up front than 13cm's could provide, so I went for Audioscape door pods up front from AudioScape which cost £185 incl VAT and delivery.
Audioscape door pods
This is very expensive, but they are excellent quality (made from fibreglass, MDF, and black plastic leather trim) and look smart, and also have slots for the electric window switch (it replaces the original door pockets). They also pre-cut the pods with templates designed for the speakers you specify.
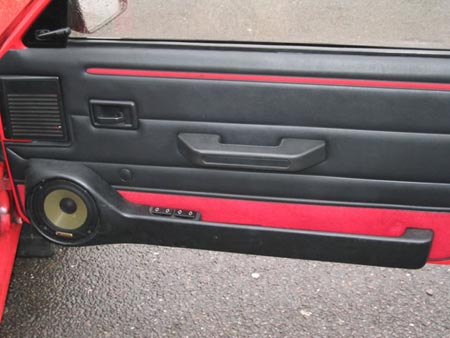
Focal 6.5" mid-range speaker in Audioscape door pod
How do i get to those rear speakers?
I put the standard 5.25" 2-way infinities in the back for rear fill. They did not however fit straight away. They did fit in the FRONT when I tested them with no problems, it just seems that the rears are slightly smaller.

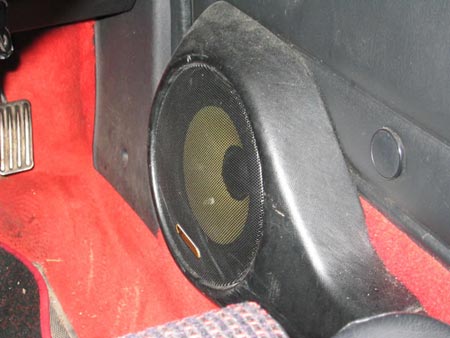
Infinity 5.25" coaxial speakers in standard rear locations
To access the rear speaker locations: make a cup of tea, pop off the speaker guards/grills, pop off the rear seatbelt caps, unbolt the rear seat belt, unscrew the springy small black plastic things (not sure what they are for, but they are the bits in the side of the car with a deep screw going into them), unscrew the parcel shelf pivot, take out the rubber seal from the rear windows to allow the black hard plastic trim to be removed, then slide/force out the piece of trim that restricts your access. This was quite difficult, especially to get back in. But it's just fiddly - persevere! I used a mallet and hammer to shape the speaker holes so that they would fit my Infinities, but you could use a file or a grinder. Just a bit of elbow grease basically!
The job:
Here is a step by step guide to how I installed all my gear. Hopefully you'll have access to a sheltered area of some description.
1. Draw a wiring diagram and get a good idea in your head of where everything is going. A wiring kit will help a lot with this to save having to buy separate wires and install fuse holders etc. Make a list of tools you will need to buy to do the job. Lots of crimp connectors and a mole wrench is the best way to connect the speaker wire in terms of speed and ease. You need screwdrivers, a set of torx screwdrivers/allen keys for the seats, duck tape, insulating tape, a jigsaw, a file, a hammer (!), screws, bolts, gripfill, some grommets, some silicone sealant, rubber washers, a drill and a small and a large drill bit (power cable and pilot holes), some draught excluder (as a gasket for the subwoofer if necessary), a pencil, calculator, some paper, a large straight edge and a ruler, wire cutters, wire strippers, and tonnes of crimp connectors. A dad helps aswell if you can find one! Probably more stuff too but that's all I can think of.
2. Make a cup of tea.
3. Remove AS MUCH AS POSSIBLE from your car. You'll see straight away how much easier it is to work with stuff removed. Firstly the seats (necessity). Undo the torx head bolts from the seat rail on the bottom of the seats and lift them out. Take the door rubber seals off. Lift up the carpet (it doesn't have to come out unless you are planning on a complete deaden/replacement of the waterproofing). Take out the parcel shelf while you are at it.
4. Disconnect the battery -ve lead.
5. Lay the wiring. I couldn't find an easy way through the firewall from the engine bay for the power cable to run from the battery, so I carefully (!) drilled a hole big enough for some clear plastic tubing to pass through. The hole was drilled from the cockpit side, and I removed the glove box and drilled behind and underneath the fuse box. Where the power cable goes through the firewall to the engine bay, run either some tubing and seal the ends with silicone, gripfill etc, or put a grommet through (the tidier option but I couldn't find any). This is vital to stop the power cable chaffing against the metal, and should be done wherever cables pass though metal in this way.
Put the appropriate fuse into the fuse holder. Vital to stop your car setting on fire when the amp throws out a random power spike! So the power cable's out into the cockpit (it will probably have to go through this way because of the fuse holder in the power cable), now pull it through all the way until there is hardly any slack in the engine bay. Feed the power cable down the left hand side (nearer to battery) and the RCA's (signal from head unit) and speaker cables down the right hand side. This will help stop any unwanted electrical noise such as alternator whine.
6. Another cuppa and some munch.
7. Speaker cables. For the front speakers, you have two choices. Keep the original OEM speaker cable at the front and connect your new speaker cable to it, thereby forgoing the need to re-route the speaker cable through the door (a royal arsehole), OR completely re-run the speaker cable and not use the factory cable (the better option). Due to the increased power going through the cable from the amplifier (most head units, even very modern ones, only put out about 20W RMS) you will need thicker speaker cable to avoid power loss from the higher resistance of a speaker cable. The factory cable is only a short proportion of the total length so the power and sound quality loss will be small but significant. I replaced both cables going through the door and grommet for electric windows and central locking using the following method. Get a wire coat hanger and un-twist it. Unscrew the plastic panel in the kick well which allows access through from the car's shell to the kick well. Open the door and remove any crappy OEM speaker already present. Seal the factory speaker spade terminals with electrical insulating tape just in case any short occurs (even though the other end wont be attached to your head unit). Push the new speaker cable through from the door end. To do this, tape the wire to the coat hanger with duck tape, and spray it with WD40. Pull both ends of the rubber grommet back towards the door so that you can grab the cable when it comes out, and push the coat hanger through the grommet. It should slide through eventually. Now pull the cable through. The inside of the grommet should be pretty smooth at this point cause of all the grease. Feed it under the carpet through the car and through into the boot. Make it invisible as much as possible, just check where you can put it and what you can lift - it can be done.
8. RCAs. Piece o' piss luckily. Either run two sets, one from each RCA channel from the back of the head unit (probably best if you plan to add another amp in the near future), or do what I did and split them using an RCA splitter in the boot. Each RCA produces the same signal so splitting them instead of running two sets will be cheaper and will not result in any audible difference in sound quality or SPL. To access the rear area behind the head unit simply pull the carpet away from the bolts behind the pedals and feed the RCAs behind and below the centre console area. Plug them into your head unit line out channels. If you don't have any RCA outs on your head unit, you can still use the speaker out cables, but this is not preferable, and you will have to buy or make some sort of RCA adapter. Read up on this before you do it to check first though.
9. Sound deadening. A MUST in a 205, especially with an amp. They are fast because they are light, and they are light because the bodywork is made from cardboard! Not really, but it will vibrate, so but some sound deadening. "More cost" I hear you shout! Well not only will it help stop panel resonance, but it will also make your bass tighter and louder. There are many product options, such as dynamat, brown bread, even B&Q roofing felt. But I can heartily recommend Brown Brothers/Partco sound deadening. About £20 for a pack of ten bits, which will easily do a door. Brown Bros sound deadening comes highly recommended. It is cheap, easy to work with, and it works well. To do the doors, remove the from window rubber seal, unscrew the large handle, unclip the small door handle cover, unscrew the door pocket, and unclip the door card, lifting it over the door lock. Now apply sound deadening to the metal parts of the door, inside and outside actually INSIDE the door, but be wary of applying it to the metal nearest the driver and passenger. This is because I found that the door card wouldn't go back on properly when I applied material to the actual door card and the outer metal skin. Pop the door card back on and replace all the trimmings. Slam the door and listen to the satisfying *CLUNK*!
10. Front speakers. Apparently the 205 can take 6.5" in the door without pods just by cutting a small amount of metal out of the door. They will sound better in some good pods though. I used 6.5" in door pods as I have already said, and had to cut the door anyway a tiny bit, but most 5.25" will fit up front in the stock locations so this is preferable as the cheap option if you aren't too fussed about having large speakers up front, and especially if you have a good sub in the boot.
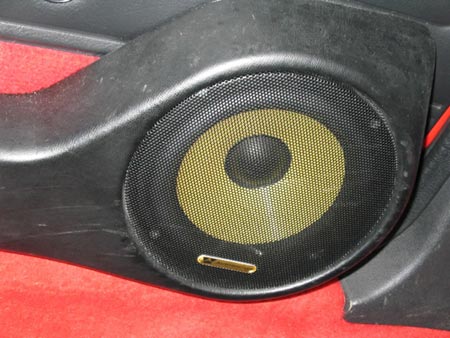
front speaker in the door pod close-up
Co-axials can be used, but I much prefer components, and they are not too hard to fit in a 205 even though there are no factory component locations. Components offer improved sound indirectly through the option of positioning the highly directional tweeter speakers to suit imaging. Also, bass response is slightly better due to the increased cone area of the woofer speakers, and they can take more power. Crossovers are easy: screw them in the glove box on the passenger side and in the little compartment thingy beneath and to the right of the steering wheel on the driver's side. The tweeters can be easily mounted on the dash, on those small flat things beneath the blower vents and on the extreme side of the dashboard. These can be easily removed - they just clip in to their mounts. Take them out, and drill holes for the tweeters, feeding the cable behind the dash down to the crossover. When mounting the front woofers into the doors, it makes a big difference to use rubber washers between the screws and the metal. This helps stop the whole door vibrating like a bitch (but hey it's a pug so it probably will anyway). Connect the speaker wire up and replace the grills to deter thieving scum.

Focal tweeter mounted on an A-pillar
11. Rear speakers. A controversial point - do you need any in a car as small as a pug? With an amp and a sub the chances are no, especially if you have gone for 6.5" up front. However, if you carry passengers a lot, you may find them demanding it! I have gone for rear fill because I like it. Audiophiles will tell you it mucks up your sound stage though. You must first ask yourself if you can be bothered with replacing the factory rears. You may find them adequate, and for the amount of work it may not be worth it. But I did it, and I'm glad I did! Mine are running from the rear channels of the head unit and are more than enough. To gain access follow my instructions up the top. Use the factory wire to carry the signal unless you are amping the rears as well, in which case there is a grommet in the metal under the trim and below the speaker hole which is great for re-routing the cable.
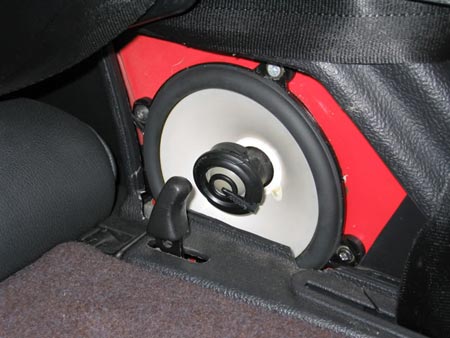
rear speaker location close-up
12. MDF!!! Right, now for the MDF parcel shelf, the subwoofer box, and the false floor. I have used a box screwed to the false floor, and screwed the amp vertically to the sub box. Don't worry about vibrations shaking the circuit board etc, it isn't gonna happen. DO NOT mount the amp upside down on the parcel shelf. It will re-absorb all the heat dissipated through the fins, and cook itself. On the floor, I used some foam to absorb any condensation moisture and help dampen the vibration right against the boot floor, followed by a layer of 6mm MDF bolted through the bottom (use washers, and watch out for drilling through the spare wheel!). You could use 12mm MDF for the floor, but I wanted to lower my car using the torsion bar! It's all gonna add up and slow ya car down. Next I used some thick grey carpet as the top layer in the boot. If you cut the floor to exactly the correct dimensions to make it fit snugly into the boot, then bolting through the shell will not be necessary. The floor won't move much at all. It's best to have one because the sub box needs to be bolted to the false floor though. For the parcel shelf, you may think that without 6x9s, an MDF parcel shelf is not necessary. However, when that sub starts moving some serious air, the shelf is gonna flex and start making a flappy farty sound. For the shelf, buy a sheet of 12mm MDF and cut it using the original parcel shelf as a template. Use some strips of harder wood as a brace to stop the shelf sagging under its own weight. Bolt the MDF to the shelf and cover in acoustic cloth to hide the bolts if necessary.
13. Now for the sub box. Sealed is the easiest, but you won't get those long loud extensions on the bass notes unless you go ported or band pass etc. Sealed is good for tight bass, and pretty good for sound quality. I made sealed to save time, and I like it. Go to B&Q and they can cut the MDF to the size you require (usually). Buy some liquid nails/gripfill etc, and some wood screws. I screwed and glued for extra strength, but people swear by these modern wood glues so it probably isn't necessary. However, it pulls the wood together and increases the chances of an airtight seal (vital for a sealed box obviously - test this by pushing the sub woofer cone inwards, it should spring back out fairly quickly). Get a jigsaw (only about £25) and cut the hole for the subwoofer. Cut it too small if anything to be safe. When you assemble the box, use s*itLOADS of gripfill on the inside to make sure there are no air gaps. You wont be able to see it so be crazy with it. Drill pilot holes with a small drill bit for the screw, otherwise the MDF will crack when you screw the screws into it. Drill a hole in the back of the box for the sub woofer cable, and fill the gap with silicone (don't install the sub until this is dry) or gripfill, making sure it is airtight. Use draft excluder or some kind of gasket to seal the subwoofer rim against the box. Carpet the sub box so it looks cool. Get some 'L' brackets and screw one to each corner of the box when it's done - these are used to screw the box to the false floor. Connect the sub to the cable, and screw the sub down the box, again drilling a pilot hole first. With the box facing backwards (better bass than if it faces forwards), bolt it to the false floor through the L brackets.
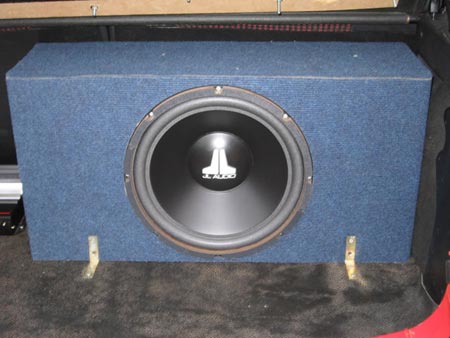
JL subwoofer with a custom box, securely mounted in the boot
14. The amp. This should be dead easy to just screw to the box. Either that or make an amp rack or build it into the false floor. Recessed looks excellent, but I used the simple lazy arse no-time method. It works well enough! Just doesn't look as cool. I would connect all the wires first though because it might not be as easy to do so with the amp screwed down. There is a pretty good earth point for the amp on a 205 - a bolt on the side of the boot metal. Sand away the paint first to ensure a good electrical contact, and re-screw the bolt down with the earth connected to it. The earth should be as short as possible and the same gauge as the power cable. Buying an autoleads powerkit or something like it should sort this out. Make sure the fuse is seated properly in its holder. Run the remote switch on from the head unit to the amp, alongside the speaker cable will be fine (it only has a tiny voltage and only when you switch on the head unit), and connect it to the amp. Read the amps wiring instructions for how to bridge the sub etc. Connect speaker wire and RCA's appropriately.
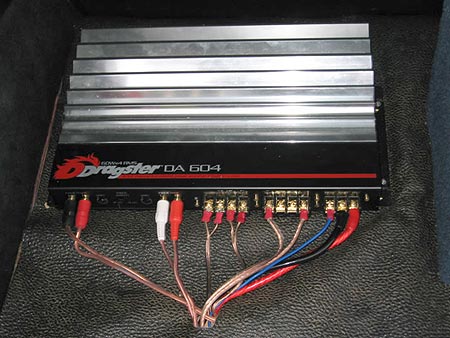
Dragster 4-channel amplifier, mounted in the boot as well
15. Go and find your girlfriend, who by this time will hate you, and switch it all on! Pray that nothing blows up and that no burning smell is evident, and re-fit all the trim seats etc that were removed. Hoover the car, tidy up, and pass out on your bed.
16. Get bored and replace all of the above with better kit!
17. Weep and curse when some tw@t steals it all.
18. Buy a CAT 1 alarm.
Summary:
Here's what the finished installation in the boot of my 205 looks like:
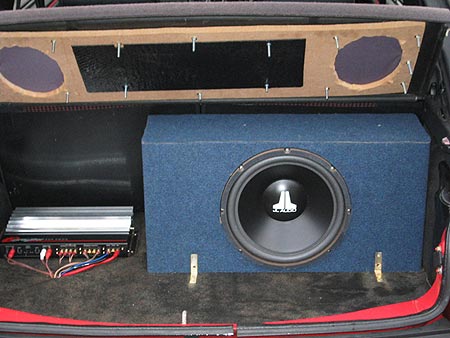
all gear mounted and wired in
Do it yourself! It's more satisfying, and free!
Finally, thanks to all the boys n gals at Car Audio Direct for their help and advice during my install - most of this knowledge is from them.
Any mistakes/omissions/etc please email me and I will re-submit.
Hope this helps someone somewhere... :-)