
Introduction.
A quick "how do" guide for fitting the drivers side one-touch electric window setup from a later Phase 2 Peugeot 405 into a Peugeot 205, giving you the ability to make the window go up and down automatically with the touch of a button as found in most modern cars.
This guide assumes that you have reasonable knowledge of vehicle electrics and a degree of common sense, and as with any work to vehicle electrics, there is the risk that mis-wiring or short-circuits could result in serious damage or fire. Please do not attempt this modification if you are in any doubt as to your abilities, and I take absolutely no responsibility for any damage or loss that may result in following these instructions.
This guide is applicable to any 205 model fit original fitment electric windows, including Phase 1, 1.5 and 2 GTi models. I can't see any reason why it wouldn't work on aftermarket electric windows, but the wiring will differ slightly and you'll need to work out the required connections for yourself.
What you'll need to get from the donor 405.
Everything that you need to get from the donor 405 is located in the drivers side front doorcard, and is fairly obvious once the door card is removed. The door card is secured using a handful of torx screws which are all obvious enough, noting that the ones securing the inner handle need a fairly long reach torx bit to remove.
You need to remove the following:
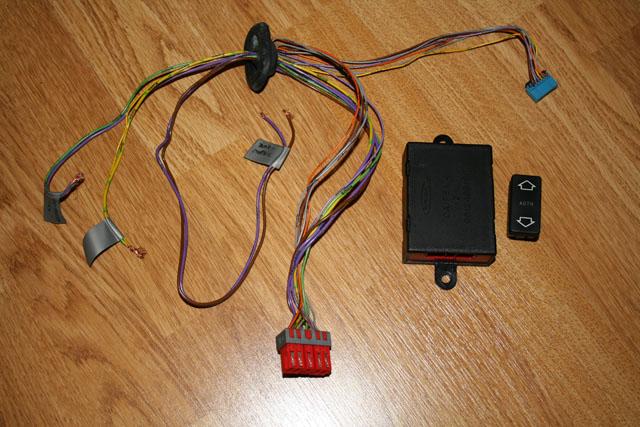
The one-touch window switch
The window control module
The door wiring loom.
You don't need the side of the wiring loom where it joins the rest of the car loom underneath the dashboard, so the easiest thing is to just cut the loom where it goes between the body and door in a rubber conduit. The door loom also contains the wiring for other circuits as well, such as the central locking and electric door mirrors, and the wiring for these can be safely and easily removed.
Optionally, it would be worth removing the matching window switches for the other window(s) as these are illuminated unlike the original 205 ones. They are pin compatible with the 205 switches, and hence a direct replacement.
Wiring Information.
The guide was written based on converting a 1992 (Phase 2) model Peugeot 205 GTi using the one-touch window setup removed from a 1994 (Phase 2) model Peugeot 405 GLX. I would strongly advise confirming both visually and with a multimeter that the information below matches your particular setup before carrying out the conversion, as Peugeot are notorious for being inconsistent when it comes to wiring and there can be differences between looms on different age vehicles depending on supplier, specification, and how much red wine had been consumed that lunchtime.

405 Control Module Wiring:
Top Row:
1. Purple #6040 - Motor Wire 1
2. Yellow/Green #M603 - Earth
3. N/C
4. Brown #6050 - Motor Wire 2
5. Purple #6005 and Purple #6001 - Switched +12v
Bottom Row:
1. Orange #6041 - One Touch Down
2. Grey #6051 - One Touch Up
3. Green #A302 - Switched +12v
4. Brown #6052 - Down
5. Grey #6042 - Up
405 One Touch Window Switch Wiring:
1. N/C
2. Brown #6052 - Down
3. Grey #6042 - Up
4. Purple #6001 - Switched +12v
5. Yellow/Green #M600 - Earth
6. Grey #6051 - One Touch Up
7. Orange #6041 - One Touch Down
205 Electric Window Wiring:
1. Purple #96 - Motor Wire 1
2. Yellow/Green #M2 - Earth
3. White #92 - Switched +12v
4. Yellow/Green #M1 - Earth
5. Brown #97 - Motor Wire 2
The following connections are required to join the 405 loom to the 205 loom:
(405) Purple #6040 -> Purple #96 (205)
(405) Brown #6050 -> Brown #97 (205)
(405) Purple #6005 + Green #A302 -> White #92 (205)
(405) Yellow/Green M600 + M603 -> Yellow/Green #M1 (205)
Fitting into a 205.
Switch modification:
The 405 switch fits into a 205 switch holder, but there is a small raised lug on the switch that needs to be removed as it fouls the switch holder. I cut it off in a few seconds with a dremel, but it would be equally easy to cut it off with a knife if you don't have a dremel. Alternatively, you could cut a slot in the 205 switch holder to allow the unmodified switch to be fitted.
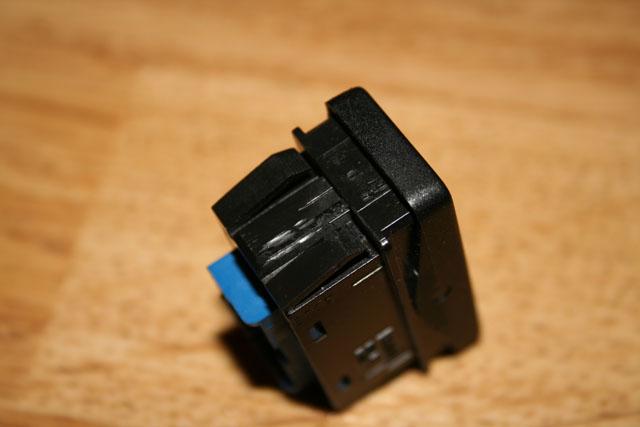
If you're using the other matching switches from the 405, they need the same modification carrying out.
Wiring modification:
Following the wiring information above, make the four connections required. There's two ways of going about this - either cut the original 205 and splice the wiring in directly, or do as I did, and make it so that the 405 loom plugs in directly in place of the original switch with no cutting or modification required to the original loom.
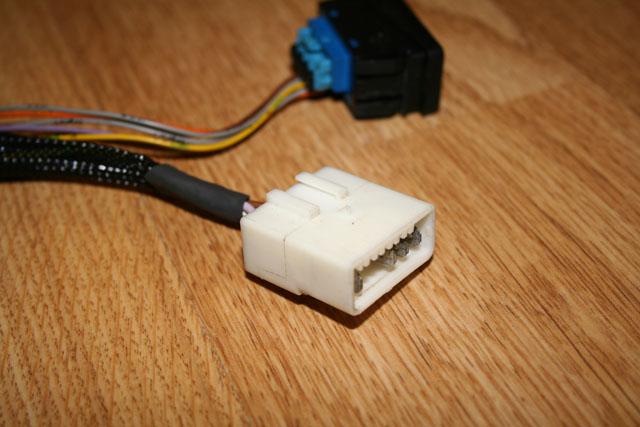
Handily, if the donor 405 had electric mirrors (as most will) then the white 5-pin wiring connector where the 405 loom connects to the mirror is perfect for the job and you'll already have it on the loom you removed. Otherwise, the plug and pins are still available from Peugeot at the time of writing.
There is just about enough space to fit the plug inside the car behind the switches, rather than needing to have it floating around in the bottom of the door where the unsealed connector is liable to suffer in the damp environment, leading eventually to corroded connections.
The advantage of doing it this way is that it means that you can completely unplug the one touch setup and plug the original switch in for troubleshooting purposes, and also it is easy to completely remove should you wish to put it back to standard for whatever reason.
Fitting the module:
You'll need to make your own decisions here as there's no "standard" place to mount the module.
I chose to mount the module inside the door, between the inner skin and the glass and roughly in line with the rear of the door pocket. There is sufficient space here to allow the window to clear the module and wiring, and the wiring is long enough to reach without needing to be extended.
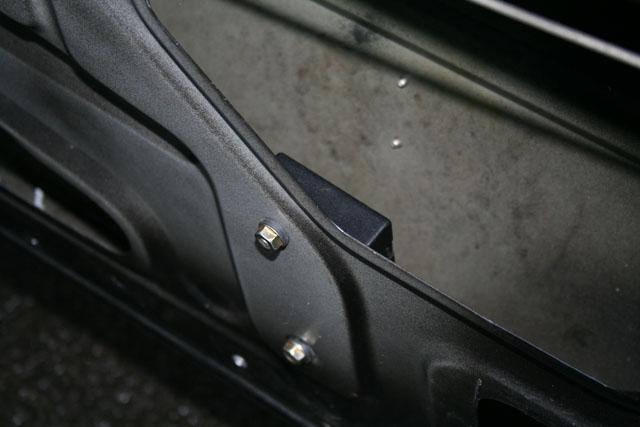
I mounted the module using a couple of rubber mounting grommets normally used on the central locking motors, which should minimise the level of vibration that the module is exposed to and hence the risk of premature failure. Mark and drill a couple of holes in the door, fit the grommets and matching plastic top hat pieces, and then use a couple of suitable M6 nuts and bolts to secure. A little grease or waxoyl between the grommets and the door would be advisable to keep rust at bay.
Whilst not directly exposed to moisture, given that the inside of the door does get wet and the module is not waterproof, I choose to wrap the module to weatherproof it somewhat - certainly it will be splash proof, and if the car is submerged in deep enough water that the module ends up getting wet then I've probably far bigger worries than a non-functioning window!
Owners of earlier 205's that have the door looms passing through a rubber conduit could potentially extend the wiring and mount the module inside the car underneath the dashboard somewhere should they choose, but this is much more difficult to do on later Phase 2 cars (such as mine) as there is a semi-sealed wiring connector on the door loom.
Worth making sure that it all works correctly before refitting the door card!
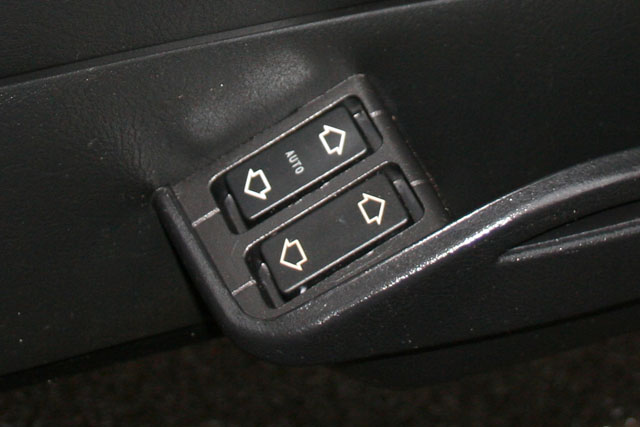
The finished result:
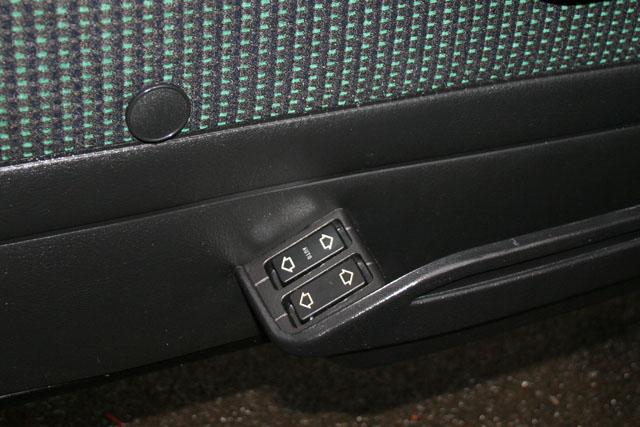
With it all fitted and the door card and plastics back in place, you should be left with something that looks like this - very much OE and looks like it left the factory like that. In terms of operation, you press and hold the switch gently in either direction to move the window up and down manually as before, or briefly depress the switch fully and release for the window to make the window fully open or close automatically.
There you go - modern touch to a classic hot-hatch. Enjoy.
-
 1
1
-
 1
1