-
Welcome to 205GTIDrivers.com!
Hello dear visitor! Feel free to browse but we invite you to register completely free of charge in order to enjoy the full functionality of the website.
Search the Community
Showing results for tags 'Bare Shell Rebuild'.
Found 1 result
-
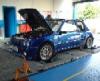
Its been a while since i have been on the forum all the joys of setting up a new business. I thought it was time to show some progress on my friends track car we have been building. It started life as a 1.6 gti but the engine was soon ditched and a MI16 was dropped in. Over a year or so it was upgraded with forged pistons, cams etc. A cage was fitted and the car stripped out. After many track days a few problems started to surface manly duo to the age of the car we decided to sort the car out once and for all. We took it to my workshop and started the strip down. I forgot to take photos of the start of the project i will try and find some and post them in this thread. Any way after the strip down and getting the shell blasted we were surprised to see how solid the car was. There was some rust and rot but nothing major the only pannel we replaced was a front wing and while we were at it we decided to replace the other one as well. Once that was taken care of out came the paint. so after a few weekends this is our starting point. http://www.flickr.com/photos/99415579@N07/9373521612/ http://www.flickr.com/photos/99415579@N07/9373521718/ http://www.flickr.com/photos/99415579@N07/9373521840/ Forgot to say before I sprayed the car we decided that the seats needed lowering so we cut out pat of the exhaust tunnel and bent some steel and welded it all together i didn't get any photos of the construction but you should be able to see what we did in the photo. Next on the list was to clean and paint any part we were reusing. I started with the roll cage once painted in it went. A extra pair of hands is always handy thanks Tomo. http://www.flickr.com/photos/99415579@N07/9373522022/ Next up was the subframe A complete strip down and shot blast later we had a base to start from the sub frame was stitch welded then painted. a quaife quick rack was then assembled with new tie rods and rose joint track ends. The wishbones had poly bushes fitted but as they are going to be replaced in the near future just given a quick clean. http://www.flickr.com/photos/99415579@N07/9373539634/ and the finished item http://www.flickr.com/photos/99415579@N07/9373539748/ The seat was then test fitted so much better our heads don't bang on the roll cage. A brake bias pedal box and some heat reflective film fitted to the bulk head. Also braded fuel lines were loosely fitted. http://www.flickr.com/photos/99415579@N07/9373539540/ All the arch trim was cleaned smoothed and painted along with the boot and trim. We cut and drilled some bronze tinted polycarb and fitted the new windows. The rear beam was put back on with new gaz shockes http://www.flickr.com/photos/99415579@N07/9373522154/ the front subframe was then fitted http://www.flickr.com/photos/99415579@N07/9373539826/ The project is going well and will upload some more picks over the weekend Johnny