Jump to content
  • Welcome to 205GTIDrivers.com!

    Hello dear visitor! Feel free to browse but we invite you to register completely free of charge in order to enjoy the full functionality of the website.

Sign in to follow this  
Rallyepalmer

1988 205 GTI 1.6/1.9 restoration

Recommended Posts

Rallyepalmer

I've decided to give my long-suffering 205 GTI a good ol' cleanup!


I used to own a 1.9 Dimma, which had a rough engine. Decided the best thing to do would be to get a full recon engine fitted.

After this was done, it was converted to bike carbs - unfortunately, the years were not kind and the shell had rotted away behind the body kit, resulting in needed a new shell.

I found a fairly good condition 1.6 shell and decided to use it as a base. This was around 11 years ago!


QwuE8bfl.jpg


After the engine was fitted, the new white 205 had a good clean up - but then my circumstances changed and it's been sat under a tarp in the garden for 10 years, these photos are taken before it was stored. 

During this storage time, the car was broken into and the carbs and a lot of other parts were stolen, which made me lose interest even more. Luckily, I know a lot of local people in the car world and these were recovered and refitted.


hy61LHzl.jpg

7c0mWL1l.jpg

JkKe39ol.jpg


Recently, I decided to sell the car as I needed money, so got her up and running again after cleaning the carbs and running fresh fuel through them.

Then it hit me... I have missed owning an old Peugeot and very much regret selling my fully restored 106 Rallye, so I've decided to keep it and get it back to good condition. 


0SBww8Zl.jpg


After it was up and running, I decided to get the engine out and give it a once over. I removed the cam and diff - to replace it with standard - as I want to make this a more road-biased car than the Hillclimb engine it was originally intended to be. 


mJHQOeCl.jpg

WQzQ5zbl.jpg

fuKCUlel.jpg

gqPhrDhl.jpg


Sandblasting and powder coating various parts;


Z2mTSk7l.jpg

PO8WMR2l.jpg

NxQtSAjl.jpg

mKbxqYSl.jpg


Added more vacuum ports to the manifold so the dizzy works a little better.


7OHzqwFl.jpg


Whilst waiting for parts to arrive, I've taken a look at the bodywork, the bumpers are very bleached so attacked them with black dye.


PkUKiLkl.jpg

Qusrqkgl.jpg

Nhil6Hvl.jpg


I'll finish the rest another day as I've found something that needs more attention!


morQLVol.jpg

wmHzGvrl.jpg


Luckily this is a straight forward job - the new panel has already arrived. Just waiting for the sun to come out!


Edited by Rallyepalmer

Share this post


Link to post
Share on other sites
Leslie green

Good to see you have found some time to get this one sorted after all these years 

Share this post


Link to post
Share on other sites
Gohn

good pictures,

is it ok to ask, did you powdercoat your camcover at home ? I didn't know that was possible ?

and why not leave the LSD in it, even though its a more regular car now, they are superb diffs, way better than the 'orrible OE open diffs ? dont need to be track racing to have one ?

nice work

Share this post


Link to post
Share on other sites
Rallyepalmer

Yes, sand blast and powder coat all my own stuff. We've got a large, custom made, oven. It's quite simple once you have everything set up correctly. We use a fairly standard oven for smaller parts too. 


As for the diff, it was sold on to fund the rest of the restoration. I found it to be quite harsh on the road and, with no power steering, a hassle around town. It work beautifully at speed but a standard diff will be good enough for the odd Sunday drive. 

Edited by Rallyepalmer

Share this post


Link to post
Share on other sites
Rallyepalmer

A bit of progress made!


I'm not massively happy with the quality of my work on the panel welding - but it will do for now. I only had access to a gasless mig, which is in no way ideal. 

MocTVHjl.jpg

WW6eS7Rl.jpg

LwLVxwkl.jpg


It still needs a bit more work and spraying but it is now structurally sound (if a little ugly!)


The engine is now back together after a head skim and new gaskets all around. A Newman Ph1 cam has replaced the Piper 285. 


Next was to tackle another issue with the carbs. The filters!

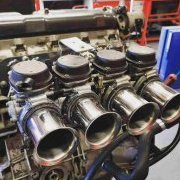
As the Fazer 1000 carbs have a very weird inlet size of 58mm, I had to run without velocity stacks with only sponge filters. I sourced some standard Fazer 1000 stacks but they were rubber and just too flimsy to do anything with.

I managed to find some 57mm exhaust flared ends and made up some velocity stacks to fit and also add some nice double filters which should improve drivability and overall performance. I'm quite chuffed with how this one turned out. 


These are the standard stacks - really poor quality.

j3PA2kWl.jpg


These are the exhaust flared ends that i sourced, stainless steel and polished up nicely.

AyCEUcql.jpg

HBpgJSLl.jpg

W62RL8Ml.jpg


A comparison of the new set up on the left, to the old setup on the right.

dCPb3fGl.jpg


Length is around 70mm at the moment but I have a feeling I will need to chop down to around 55-60mm to get enough clearance inside the filters without having the filters pushed up against the radiator. 

2lFNF3ll.jpg


A rather smart result I think!

pXUCsGal.jpg

IJpxiFgl.jpg


TBC...

Edited by Rallyepalmer

Share this post


Link to post
Share on other sites
Rallyepalmer

Got round to painting the front panel and repaired parts today.

Gave it all a quick scrub first. 

ImEcmtql.jpg

BvjIiZnl.jpg


Then paint!

Q84twrHl.jpg

E2UEhLLl.jpg

XdqGljJl.jpg


Not perfect but good enough for me. No doubt I'll continue to tinker with it and get it tidied up a little more.

The NSF wing needs a bit of adjustment but it's turned out not too bad!


Then the fun part - engine going back in!

yDfLGxel.jpg

tsupwrtl.jpg

Ek9dctZl.jpg


Really happy with how everything is going so far.

With any luck, she should be running tomorrow. Looking forward to that!

  • Like 1

Share this post


Link to post
Share on other sites
Rallyepalmer

Today I've mostly been playing with the engine loom - it's in pretty bad shape!

I've managed to get most things working but it will need renewing. No interesting photos but lots of chopping and soldering going on.

The radiator fan works, along with the lights. Still working on all of the sensors.


Also... she's now running!


Much better idle and low rev pull with the Newman Ph1 cam. 

I did have to advance the timing a fair amount on the dizzy, which could be due to it getting proper vacuum now or it could be I'm a tooth out on the belt... I'll check it out another time.

At the moment though, sounds great.


I still have an annoying misfire - so will be changing the whole ignition system to new parts in the near future as just cleaning them doesn't seem to have fixed it.


This video is before the rebuild


This is after!


Discovered the wipers are totally seized, so I've been trying to free them off but I may need to get hold of some new sleeves. 

OfrSHBxl.jpg

WhrKl7yl.jpg


Other than that, I gave the car a quick clean-up today.

The paint has held up well, considering it's been stored outside for so long.

DKh0cLEl.jpg

FjQyFGdl.jpg

LHnVo3Vl.jpg

IMnfcwvl.jpg


I'll get the car back together over the next couple of days, the bump strips  will be finished and fitted and the front bumper mounted, after repairing the mounts that is!

Share this post


Link to post
Share on other sites
Rallyepalmer

As I'm terrible with electrics, I had to call on my Dad for help.

We're both mechanics by trade - but I don't know a better auto electrician, he's a wizard with this stuff.

We've got everything working as it should, except the engine coolant sensor which we believe to be faulty.

The misfire is also now gone - a new set of plugs and ignition amplifier got that sorted! 

fjMj3M6l.jpg


The bumpers are also back on. I had to fabricate new mounts for the front but forgot to take pictures of the process!

The front bumper was adjusted after taking this picture - it's now much straighter.

I also gave it a coat of black dye in the process.

CzkwQTll.jpg

sLLO97Yl.jpg


The same with the rear though it does need buffing and another coat applying as I'm not happy with the finish yet.

cD0XYcy.jpg

ZV2Dfka.jpg


The interior is one of this car's strongest points - I've never seen one so clean. I did have to re-foam the seats but the material has really withstood the test of time. 

Once the car is finished I'll treat it to a good wet vac (and remove the mouse nest in behind the centre console)

5dgNcE2.jpg


And that's the end to another day.

27O8iPz.jpg

  • Like 2

Share this post


Link to post
Share on other sites
Joecar

I've just come across this blog, I'm stunned – you are doing amazing work! Keep it up!

  • Thanks 1

Share this post


Link to post
Share on other sites
Rallyepalmer

Thank you very much :lol:

Share this post


Link to post
Share on other sites
Rallyepalmer

It's starting to look pretty darn good!


jfMdc61l.jpg

ai4IJqOl.jpg


I think I may need to change the brake compensator when I give my brakes a service. The rears are locking up before the fronts - could be scary! 

Share this post


Link to post
Share on other sites
Leslie green

Those seats have survived very well indeed , car looks great now 

Share this post


Link to post
Share on other sites
Rallyepalmer

Managed to get a bit more done - mostly cleaning!


The interior has come up quite nicely.

GAUTATvl.jpg

ZxnW1kDl.jpg

9R4c58Il.jpg

fCns4Ykl.jpg


Also replaced the vinyl on the door pillars.

gQYjML5l.jpg

hIQFMmfl.jpg


She's now insured, so I'll be getting her MOT'd this week hopefully.

I know it still needs work doing, wheel bearings for a start but I'd like to get it up on the ramp and checked over so I have a definitive list of what needs finishing. 


I'm very tempted to sell my comfy 2014 Audi A4 and use this as my every day... I'm totally in love. 

  • Like 3

Share this post


Link to post
Share on other sites
cybernck

Looks good and sounds even better!


But... am I the only one wondering what has happened with the Dimma in the end?

Share this post


Link to post
Share on other sites
Rallyepalmer

The Dimma was purchased by a friend and fully restored :D


It was just way too much work for me at the time and they have done a pretty amazing job with it. 

Share this post


Link to post
Share on other sites
Tom Fenton

Great job, well done.

Share this post


Link to post
Share on other sites

Create an account or sign in to comment

You need to be a member in order to leave a comment

Create an account

Sign up for a new account in our community. It's easy!

Register a new account

Sign in

Already have an account? Sign in here.

Sign In Now
Sign in to follow this  

×