
Following on from this thread here: http://forum.205gtidrivers.com/index.php?showtopic=160315&hl=
I thought Id put a guide together for anyone who might need to helicoil an XU alloy block head bolt thread with the engine in situ.
Threads pulling out of these older alloy blocks seem to be a fairly common occurrence now. Ideally, to repair the threads the block should be removed from the engine and sent to a machine shop to have the hole drilled out square to the block and a threaded insert put in place. This is often not cost effective or practical though...
I had one thread pull out of my 1.9 MI16 alloy block when tightening the head bolts luckily the engine was on the bench, so I took it to a machine shop and had a threaded insert put in place.
This was pricey at £90, so the cost to do every head bolt thread would have been prohibitive!
However with a bit of care, the block threads can be successfully drilled out and helicoiled in situ for much less.
After a second head bolt thread pulled out from my block, I managed to successfully helicoil all 9 remaining threads while it was still in the engine bay, and they have all taken the full OE head bolt torque sequence (20nm + 300 degrees) with no issues.
Heres how I went about it.
Required:
- 1 x M11 x 1.5 v-coil kit: http://www.ebay.co.uk/itm/V-COIL-M11-X-1-5-WIRE-THREAD-INSERT-REPAIR-KIT-FITS-HELICOIL-/281469574368?_trksid=p2054897.l4275
- M11x1.5 2D helicoils (1 for each head bolt thread to be repaired) readily available on ebay
- 1 drill with a decent amount of torque (I used a Makita 18v battery powered one set on slow speed)
- Small t-bar tap wrench
- WD 40
- Duct tape
- Drill guide, turned up by machinist (optional but recommended)
- Tap guide, turned up by machinist (optional)
When drilling out the old thread, its very important to keep the drill as straight as possible to ensure that the new thread and helicoil is in-line with the head bolt. A slightly off centre or at an angle hole will result in excessive strain being put on the new threads.
With this in mind I figured I needed a way of keeping the drill as straight as possible while drilling the holes, so I decided to have a drill guide fabricated.
The head bolt threads in the XU9 block sit about 50mm down from the face of the block (apart from the one above the waterpump), at the bottom of a larger diameter hole / recess; see below illustration:
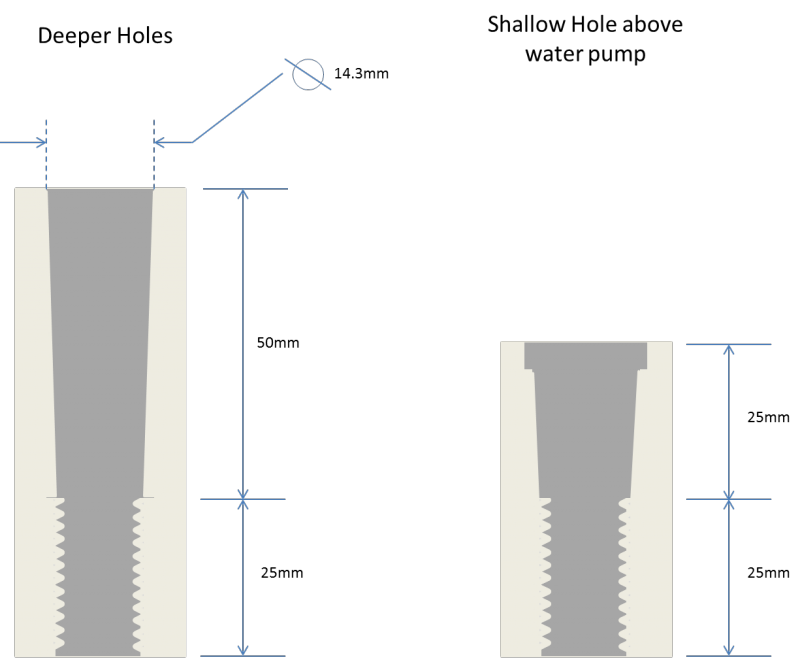
So my thinking was, the best way to keep the drill straight would be to have a drill guide fabricated to slot into the larger hole above the thread and keep the drill aligned.
I also had a guide made up for the tap, probably not necessary but I figured why not make my life easier.
The v-coil kit comes with a tap and a drill with the following dimensions:

So based on these I knocked up a couple of drawings for the drill and tap guide:
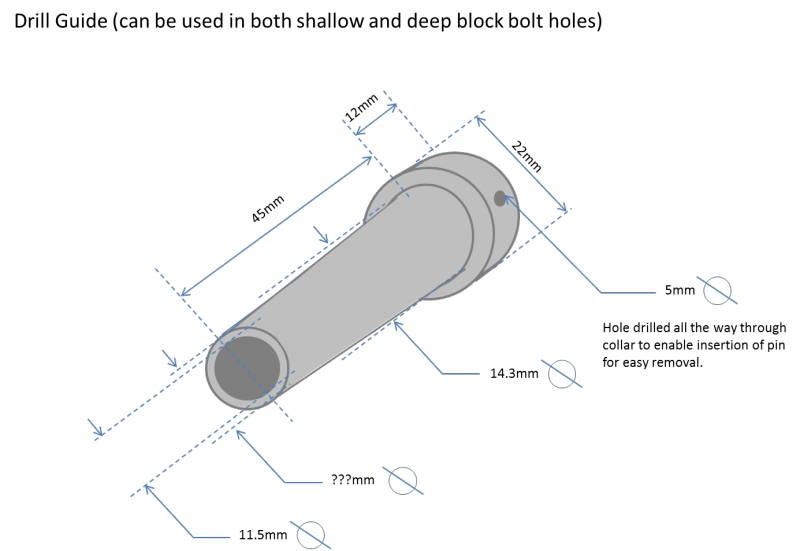
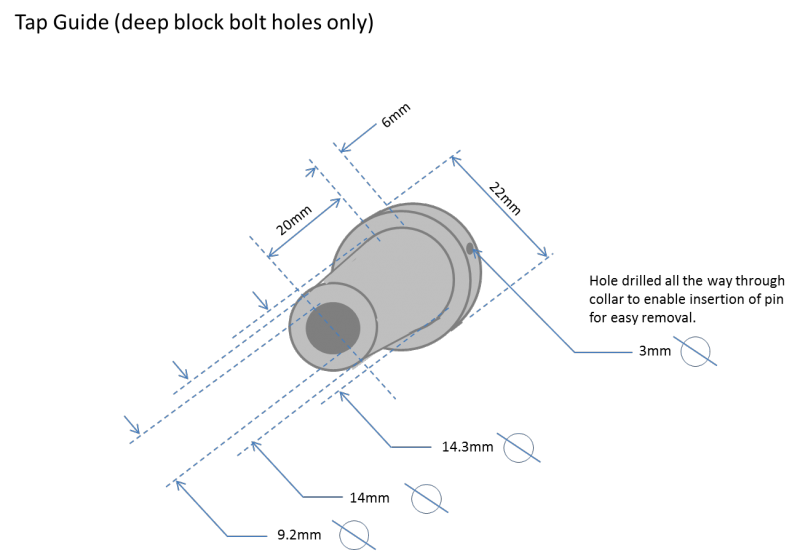
Then had them turned up for me at a local machine shop.
2 of each with slightly different diameters to allow for measuring error set me back £35. Not too bad.
NOTE: I didnt have tapered guides made up, as at the time I didnt realise that the holes were tapered towards the bottom, so the above measurements should be verified if you plan to get some guides made up yourself.
Id recommend pouring something like plaster-of-paris into one of the head bolt thread recesses, and removing once set to get an impression of the recess which can then be accurately measured.
Of course if you feel confident enough that you can hold a pistol drill square to the hole without the drill guide then you can skip this, but the drill-bit really snags at the threads when youre drilling them out.
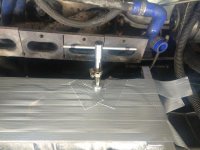
So armed with my drill guides I could attack the old threads:
1. Tape over the block to prevent any swarf entering the cylinders or water jacket
2. Insert drill guide into recess above threads to be drilled out

NOTE because I didnt realise that the recess above the thread was tapered, I had to cut the drill guide short and pack out the top of it with tape to make it a tight fit in the recess.

3. Lubricate the drill bit well with WD40 and insert into the drill guide

4. With the drill on a slow speed (high torque required, so slow speed setting is a must if using a battery drill like the one pictured), hold the drill as steady as possible and start drilling.
The drill will snag, and theres not much you can do about it, but it tends to drag itself through the hole and scoop out the original threads very quickly it also follows the original hole which helps.
I stopped the drill as soon as it got to the bottom of the thread to avoid removing more material than absolutely necessary.
It doesnt take long at all to drill out the old threads and the drill bit that comes with the v-coil kit seems to be high quality, as it remained sharp for all 9 threads that I drilled out.
5. Clear the swarf out of the hole
6. Insert the tap and tap guide ensure the tap is well lubricated with WD40

Turn the tap until you get it started, and then move it ½ turn clockwise, followed by ¼ turn anti clockwise (to break the chips). Repeat this until the thread is cut as far as you can go with the tap guide in place.
Remove the tap and guide and then reinsert the tap (lubricated with WD40) and again going ½ a turn clockwise and ¼ turn anticlockwise finish cutting the thread all the way down the tap will bottom out on the block when it is a far as it can go.
7. Remove the tap and clean out any remaining swarf
8. Put a M11x1.5 2D helicoil on the insertion tool that comes with the V-coil kit, and insert the coil into the hole (the insertion tang on the helicoil should be towards the bottom the kit comes with clear instructions)
9. Carefully wind the helicoil into the new thread until it is about ½ a turn past the first newly cut thread.
Warning the coil winds in surprisingly fast, and you cant back it out of the hole if you go too far so ensure that you dont wind it in more than about a turn past the newly cut thread.
I also think that you could use slightly longer 2.5D helicoils, as the whole thread wasnt quite used with the 2D ones, and as the head bolt threads are open, the worst that could happen is that a bit of the coil would stick out of the bottom of the hole.
10.Break off the helicoil tang with the tang removal tool.
Job done! Repeat for any other threads that have gone.
Note - if you need to do the thread over the water pump, you'll have to remove the master cylinder to get the drill in, and you won't be able to fit a sleeve to guide the tap in, plus be careful not to go mad with the drill and go into the waterpump housing.
All thats left to do now is clean up the all the swarf that manages to get everywhere, before putting the head back on with a new gasket and head bolts and then go through the trauma of torqueing the head bolts back up!