
Introduction:
When the 205 GTI was first released, the only engine option was the 105 bhp 1.6 XU engine, which at the time was acclaimed for it's high power output and, thanks to it's oversquare displacement, it's willingness to rev. Later when the 1.9 XU came out the power of the 1.6 was upgraded using the cylinder head from the 1.9 giving it 115 bhp. Despite the increase, the performance of the 1.6 was now overshadowed by its bigger brother which offered around 130 bhp and a second off the 0 to 60 mph acceleration time. The only noticeable drawback of the 1.9 engine was it's unwillingness to rev quite as high as the 1.6 due to it's longer stroke, the fine oversquare displacement was lost. Still, it was a small price to pay. The demand for more power has led to owners replacing the engines of their cars with larger engines from either more sporty versions or larger models from the same manufacturer. Myself being a 205 GTI 1.6 owner, I decided I wanted more power and set about this by opting to transplanting the 1.9 XU engine into my car. This guide should help you if you are attempting to do the same upgrade.
Differences in models:
The differences that are easy to spot visually between the 1.6 and 1.9 engines include; yellow injectors on the 1.9 as opposed to green ones on the 1.6, there is a spacer on the sump on the 1.9 (apart from 1.9 405 engines). Very early 205 GTI engines had a slightly different throttle casing which can be identified by it's white plastic housing for the throttle cable as opposed to the black one on later models. The only real difference in this change of throttle casing design is that on the later ones, the throttle cable was attached a few millimetres closer to the inlet manifold, meaning that the corresponding throttle cables vary in length and you must use the correct cable for the throttle casing. In later models various engines were made that give different power outputs and/or use different parts that may not be compatible with early models. Such differences being the CTI 1.9 that has lower compression pistons that gave less power - an engine that should be avoided. The later 1.9 units that have a different coil mounted above the inlet manifold use a slightly different injection system and loom therefore try and find and engine that has the same injection type as your own car. When using a donor car with power steering, use the alternator bracket from the out-going 1.6 engine unless you are planning to do a power steering conversion.
Note on the 1.9 oil cooler: The oil cooler that is unique to the 1.9 XU engine is not essential for conversion but it is wise to transfer it over in the conversion. Your author, perhaps unwisely, chose not to keep the oil cooler in the conversion so my information on the matter is a little scant! I can only assume that the connection of the cooler to the fan housing (where it would normally sit on the 1.9) is rather simple, but it is best to keep any connections from the 1.9 fan that my be required in fitting the cooler. I do know however, that the oil cooler on the 309 GTI engine won't transfer over to the 205 GTI due to the associated hoses fouling with other parts.
Parts required:
I actually acquired my engine from a crash damaged 309 GTI 1.9 as there are no major differences with this engine from the 205 1.9 unit and power figures are identical. The parts needed are as follows (all parts from 205 GTI 1.9):
- Complete engine block and head
- Distributor
- Starter motor
- Alternator (not essential but 1.9 unit gives more ampage)
- ECU (computer)
- Airflow Meter (AFM)
- Exhaust back box (contrary to conventional wisdom, the 205 GTI 1.6 and 1.9 share identical exhaust parts except for the back box)
- Inlet manifold and duct system
- Fuel rail with injectors.

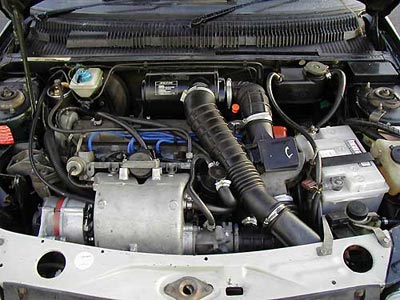
1.6 and 1.9 engines look very similar at first sight
Removal of existing engine:
The removal procedure in this guide demonstrates removing the engine by lifting it up from the bay as opposed to dropping it from under.
Firstly remove the battery, airflow meter and all inlet ducting pipe work. Then remove the front slam panel, grill and then drain and remove the radiator. This will give far more working space on the front of the engine. Then remove all cables, pipe work, tubing and electrical connectors like plugs, earth straps and any other wire that connects to the engine and gearbox. Label all wires and pipes for ease if identification when refitting the new engine. Remove the alternator and its mounting brackets as these can catch the bodywork when the engine is being removed.
The next step is to jack the car up onto axle stands and remove the driveshafts from the gearbox. Complete removal of driveshafts is not always necessary so there is no need to undo the driveshaft nut on the wheel hub end. On each side undo the ball joint pinch bolt and remove the lower arm from the hub as well as the track rod end. On the drivers side you will need to undo the bolts that hold a bearing on the driveshaft and gently ease the 'long' section from its mount. After these steps the driveshafts on both sides can be removed from the gearbox. Whilst the car is on the stands, remove the exhaust from the engine. Refit the bottom arms and track rod ends and put the car back down onto its wheels.
With the engine now only connected to the rest of the car by its mounts, it's time to lift it from the engine bay. This procedure can be dangerous and does require a few other people to help. Remove the bonnet and store it safely away and construct the engine-removing jib. Attach the straps or chains from the jib onto the two mounting points on the engine and only once the jib is taking the full weight of the engine can the engine mounts be undone. The three mounts are located at the top of the engine next to the cam sprocket, on top of the gearbox and at the bottom of the engine next to the crankshaft sprocket.
Once this is done the engine can be removed. The engine needs to be lifted along with it's gearbox at an angle to clear the inner wings. The ECU mounted under the dash needs to be removed.
Fitting of the new unit:
Before the new unit is fitted, make sure that the gearbox is attached (we'll discuss gearbox choice later) and that the exhaust manifold, inlet manifold, starter motor, alternator are all attached to the engine as it is far easier to fit these parts when the engine is out of the car. Check/tighten the gearbox linkage on the subframe - easy to do compared with later and the links often get sloppy as they loosen off. Check the condition of all hoses, replace as necessary and clean the oxide off the hose mounts on the engine (so easy to do now compared with later).
It's a terrible cliché for DIY mechanics but refitting really is the reversal of removal! Be careful when fitting the engine as the angles needed to fit the unit can scrape the paint of the inner wings. All the wiring connectors should fit back in the same place and make sure that all the hoses go back in the correct positions and that they are free from any cracks or perforations.
Gearbox choices:
The most popular choice of gearbox for the 1.9 conversion is the standard 1.9 gearbox, however the 1.6 gearbox is favoured by some as it gives shorter gearing resulting in more punchy acceleration. The drawbacks to the shorter ratio 1.6 gearbox is that due to the 1.9 engine's unwilling to rev as far as the 1.6, the driver will always be changing gears far more often than the 1.9 gearbox and the driving experience is less relaxed, but for many owners this is a small trade for a more racy drive. Later gearboxes (named BE3 as opposed to BE1 on the earlier versions) have marginally longer ratios (1.6) and no cable selector for reverse gear (both) although conversion of a car with cable shift to one without (or visa-versa) is not difficult. The Mi16 gearbox gives the same low speed acceleration as the 1.6 box but with longer ratios in the higher gears, this rare gearbox gives a good combination of the characters of the 1.6 and 1.9 gearboxes. The 306 GTI-6 gearbox would be the perfect choice in theory; short gears and an extra top speed cog, but when fitted to the 205 the extra size of the gearbox restricts steering lock and is no longer favoured by most of the 205 modifying fraternity.
Upgrading to cope:
When larger, more powerful engines are fitted to cars there usually is a need to upgrade suspension, brakes and the drivetrain. In my opinion, I feel that the brakes on the 1.6 GTI are adequate to cope with the power from the 1.9 engine but if insisted upon, the brakes can be adapted from the 1.9 although this does require new hubs from the 1.9, and in cases of the need for rear discs, new rear trailing arms need to be fitted. This whole procedure is another article in itself. The driveshafts from the 1.6 can be a weak point though but upgrading to 1.9 items requires 1.9 hubs as the size of the spline on the end of the 1.9 driveshaft is larger. Driveshafts from very early 205 GTI 1.6's that have larger bearings and other components in the CV joints, are a good choice for those who want to keep the 1.6 underpinnings whilst having more sturdy driveshafts than the more common later versions.
The final result on the road:
It wasn't long after I had the 1.9 engine running that I took it for a test run on the open road. The first major difference was the huge increase in power from low revs. This increase in torque coupled with the 1.6 gearbox made the tyres squeal and squirm in protest under hard acceleration in most gears and country lanes blur past faster then ever. On the motorway, the power never seemed to die off and pushed hard all the way over a hundred miles per hour where the 5th gear ran out of revs. Running out of revs in 5th gear is the 1.6 gearbox's main drawback as due to the increase in power, top speed is achieved much more rapidly and the inability to go any faster is now even more apparent so the choice between the 1.6 and 1.9 gearbox is important, as the 1.6 does feel a good bit faster than the 1.9 gearbox, it may not be the best choice if the owner makes a lot of long distance miles in his car.
Engine specifications:
1.9 engines:
XU9JA found in models from 1986 to 1993.
1905cc
130bhp @ 6000rpm
119lb.ft @ 4750rpm
83mm bore, 88mm stroke
9:6:1 compression ratio
XU9JAZ found in models from 1993 to 1994.
1905cc (with catalytic converter)
122bhp @ 6000rpm
111lb.ft @ 4000rpm
83mm bore, 88mm stroke
9:2:1 compression ratio
XU9JI/Z found in convertible models from 1991 to 1994.
1905cc
105bhp @ 6000rpm
101lb.ft @ 4000rpm
83mm bore, 88mm stroke
8:4:1 compression ratio
1.6 engine numbers:
XU5J180A found in 1984 to 1986
XU5AB6D found in 1986 to 1992
XU5JB6D found in convertibles 1986 to 1991
Gear ratios:
1.6 gearbox:
1st 3.31; 2nd 1.85; 3rd 1.36; 4th 1.07; 5th 0.87. Final drive 4:06:1
1.9 gearbox:
1st 2.92; 2nd 1.85; 3rd 1.36; 4th 1.07; 5th 0.87. Final drive 3:69:1[/hr]