Introduction:
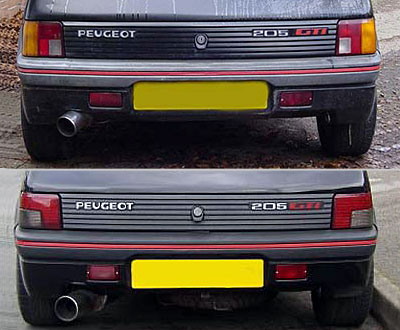
This guide explains the complete process of converting rear lights to a more modern looking phase 2 spec. Clear front indicators are a direct swap for orange ones, so there's no need to go further into that matter.
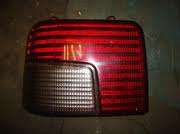
reverse light is relocated to valance with phase 2 lights (bottom)
The job:
As is always stated in the workshop manuals, disconnect the battery before starting this to avoid electrocution & blowing any fuses that might cause you to wonder why your newly wired in lights aren't working.
The easiest way I found for doing the rear lights swap from phase 1 to phase 2 style was to avoid cutting the original loom that is in the car and make up a separate loom to feed both sets of lights.
You should be able to pull through the loom for the numberplate lights to the passenger side from the drivers side as it is on the phase 1 lights to plug into the phase 2 light unit.
You only need to add a loom for the reversing light and the wiring to run to the drivers side light unit and this can be from a scrap car that fed the fog light with a little adjustment to the plug with a hot knife.
I totally removed the loom feeding the driver’s original light so should I ever want to return the car to the original lights I could do so easily.
I got my light units and cut the original loom from the phase 2 car from a scrapyard and advise you to try to do the same to make the job easier. The only wires you need to cut are all on the passenger side of the car, the drivers side loom can be pulled out once you have made the cut.
When you find a suitable phase 2 car in a scrapyard, after you've removed the passenger light unit pull the main loom plug as far out of the car as you can and cut the wiring as far inside the light aperture on the car. This is so you have as much wiring to work with as possible. The drivers side loom is a separate loom that runs across the car from the passenger side as well. If I remember correctly it is the only other loom coming from the front of the car on the passenger side & has the wiring for the rear washer bottle pump with it. Cut this in the same way as the loom to the left light.
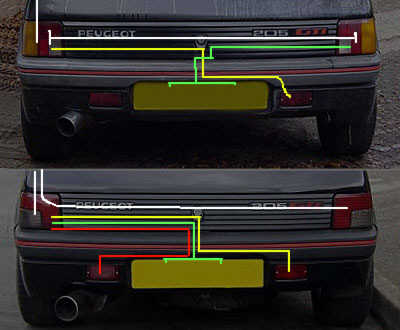
phase 1 and 2 wire rooting diagram
Key to wiring diagrams:
- White lines: Main loom into light units from fusebox
- Green: Number plate lights
- Yellow: Fog light
- Red: Reversing light on phase 2.
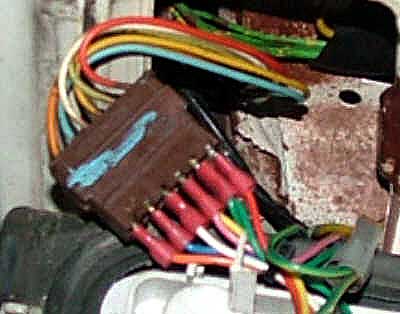
Do not cut any of the two pin plugs from the back of the light unit, you only need one of them for the reversing light, remove it as one loom with all three together & separate them if you want to. Simply un-clip them from the back of the light unit & remove the looms complete.
You only need one loom from the phase 2 lights, the reversing light one which isn't fitted to the phase 1 cars (Red plug).
I got some male spade connectors that plugged into the plug on the original loom and joined the wires up in these in the correct order to light the right bulbs at the right time.
Wire numbers in order on plugs from top (Phase 1 loom):
- Red #53
- Green #36
- Yellow #64
- White #49
- Blue #48
- Orange #151
The wiring form the phase 2 car should hopefully be the same colour as all the ones I have chopped up and they are:
Plug fitted to passenger rear light unit:
1. Yellow wire #64, tail lights/ number plate lights feed
2. White wire #49, indicator feed
3. Orange wire #151, fog light feed
4. Red wire #53, reversing light feed
5. Green wire #36A, Brake light feed
6. Green/yellow wire #M1, earth
Plug fitted to the drivers side light unit:
1. Pink wire #63, tail lights feed
2. Green wire #36B, brake light feed
3. Blue wire #48, indicator feed
4. Green/yellow wire #M7, earth
These are numbered from top to bottom as you look at the new style light units with the plug in the correct orientation for fitting.
The reversing, fog and numberplate lights fit in the plug sockets on the back of the passenger tail light unit and cannot be cross connected due to the different shape of the plugs. They are the same shape as the original phase 1 wiring so no change is needed here.
I joined the green wires together in the same male spade connector and the yellow and pink together used the same spade connector as each other too. The indicator wires obviously are plugged in separately.
connector close-up
The new wires plug into the original plug in quite obvious order from top of plug:
- Red to Red
- Green to Greens
- Yellow to Yellow & Pink
- White to White
- Blue to Blue
- Orange to Orange
I joined all the earth wires together at the passenger side of the car in another male spade connector and they can connect into the earth plug that was fitted to the passenger light unit originally.
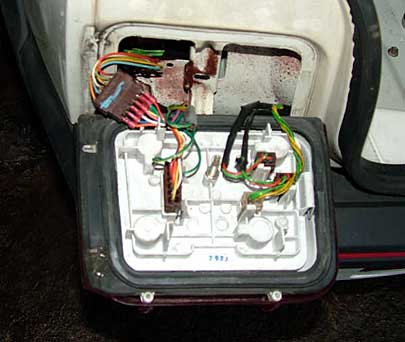
connections at the back of the left hand side light unit
The plugs on the back of the phase 2 L/H light are coloured as follows:
- Brown: Number plate lights
- Red: Reversing light
- White: Fog light.
They can't be connected wrongly as the plugs are keyed for each specific location.
If you can’t get a whole loom from a scrapyard then you could use shielded female spade connectors on the back of your light units but it would be best to use different colour wires to avoid confusion with connecting them to the right place on the unit.
The easiest way to get the wiring from the drivers side of the car to the passenger side is to link the numberplate light loom to the original cloth that feeds the drivers side light from the passenger light and pull the cloth gently through the car body.
Do this with a piece of string tied to the numberplate light loom in case you encounter any problems and also for use when pulling the new loom for the drivers side light through.
Undoubtedly the hardest part of this conversion is routing the new loom in for the reversing light, I managed to feed it in through the hole in the body under the bumper.
I routed some thin twisted locking wire (you could use garden wire) through first and then taped the new loom to it when I pulled it through to the passenger side of the car after loosening the rubber grommet. Pull this loom through carefully so you don’t tear the plug off the end and ruin the loom.
Then it is simply a matter of connecting everything together when the wiring is all in place, fitting the new light units, reversing lamp & re-connecting the battery before turning the lights on to check the new lights all work. If they do you are finished. If you have individual bulbs that aren't working, check the bulbs are OK by swapping them for known good ones.
