

Introduction:
This article is about how I went through installing the OMP AB/105/126A bolt-in (!?) 10 point rollcage into my Peugeot 205 GTI, with maybe some lessons learnt included. It's by no means a hard and fast installation guide. I can't pretend to know what I'm doing you know. It was ordered from Demon Tweeks and delivered to work. I then found I didn't have a car I could transport it home in, it wouldn't fit in my Ford Focus, a Land Rover Freelander or a few other cars I could get my hands on, so I had to borrow a van. Mental note - get it delivered to home next time.
Tools needed:
First up I'll list the tools I used for this:
- MIG Welder with CO2 gas
- Socket set to tighten all bolts
- Round metal hand file
- Hammer to persuade certain items into place
- Angle Grinder with cutting and grinding discs
- Drill with cleaning wire brushes
- Drill with 8mm & 13mm drill bits
- Long screwdriver to persuade certain items to line up.
Extra parts needed:
And now for extra items I needed to buy:
- 15 x M8 x 30mm bolts to bolt rollcage to brackets
- 15 x 8mm Heavy Duty washers for above bolts
- 1 x M10? bolt and nut to fit rear diagonal to rear cage
- 2 x spray cans of Hammerite smooth black paint
- 1 x tin of Hammerite smooth black paint
Fitting rear part of the cage:
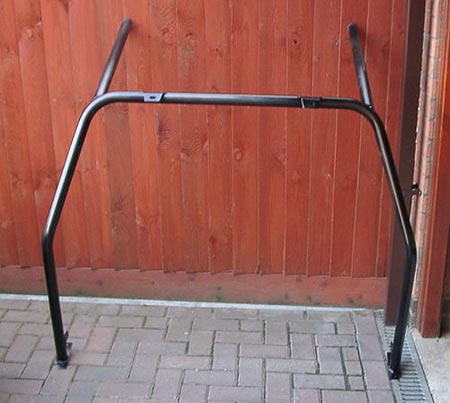
The cage comes unpainted and not particularly well finished. Before I cleaned and painted it I did a dry fit into the car after taking the front and rear seats out. These come out fairly easily, the front seats held by in 5 star bolts. The rear squabs are held in by 2 bolts at the front of the hinge, and the rear seat backs are fixed by 2 nuts onto the side of the wheelarch. This dry fit was to check that a) it fitted into the car and  how it fitted. It's worth noting that if you care about your paintwork, tape some protective sheet over your sills, and maybe your side panels to prevent it getting scratched when trying to get the cage into the car. First in went the rear half of the cage. I don't think I could explain how exactly to get the cage in, but I did it through the drivers door and by feeding in one side, then maneuvering it around to get the rest in. My car is fitted with the full sliding glass sunroof and I've had to remove the headlining and sunroof shade mechanism to be able to fit the cage in. The headlining is held in around the edges by surrounding trim and also glued to the roof. The front half went in after the rear half was in place and loosely held in place by the rear bolts onto the suspension and the seat belt bolts. To actually get the front half to fit in properly was a struggle and needed some brute force, but it went in.
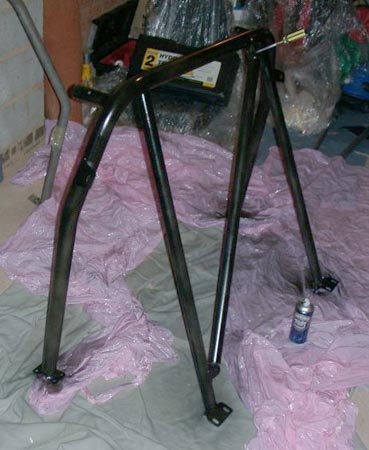
Now I was satisfied it fitted and I had marked loosely where the middle and front mountings would be on the chassis I took the cage out again. I cleaned off most of the weld splatter than was present from when the cage was made and all the packaging tape and painted it in Hammerite smooth black. This was with spray cans (Hence all the dust sheet over my garage in the upper picture) which took about 4 or 5 coats to get any where near a good finish, and even then it's not great. I think a bit more preparation and care could produce a better finish. I also think giving the whole cage a rub down with a fine wet and dry sandpaper would help the paint finish. But time wasn't on my side.
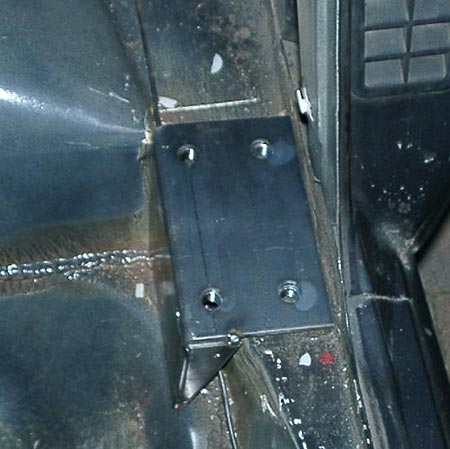
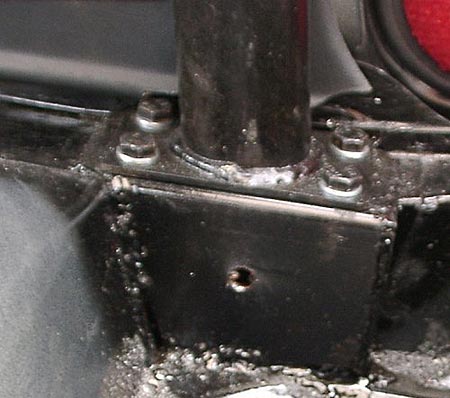
The supplied brackets that the cage bolts onto need to be welded to the car. First these were positioned loose to check where they'd fit. It must be pointed out here that these are pretty poor quality in terms of fit and finish as they need to be cut down substantially to fit correctly. Next time I'd reposition the nuts welded to the underside of the bracket to make them more central. The picture below shows a loose positioning of the bracket (All these pictures are looking at the passenger side of the car) to get an idea of the size of cleaning up that would need to go on. The bracket top face should sit on top of the sill with the nuts recessed into the sill. The side of the bracket should be cut so the edges are flush with the floor and corner of the box section so there is enough edges to weld to the car to ensure it's secure.
At this point I was still awaiting some more tools (Like my angle grinder) so I made sure all the areas were ready to clean up. This involved removing the front seat belt top and floor mountings, the rear quarter door bin trim, the handbrake plastic cover, pulling back the carpets and removing the sound deadening where possible. The sunvisors, and roof centre console housing the interior light had to be removed as well. These won't fit back in with the cage in place.
With drill mounted cleaning brushes the areas where the brackets were to be welded were cleaned of paint and sealant. This is pretty messy and the dust should be cleaned up before welding to reduce the risk of fire.
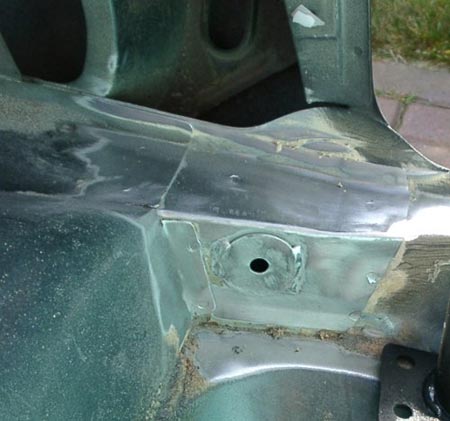
The picture below shows the sill where the middle bracket will fit after it had been cleaned up.
Then the rear half of the cage (Now painted) was dry fitted again to position the holes correctly. I'm using the seatbelt bolts as they help line the cage up and eventually will be bolted in place for real.
With the cage in place I drilled through the holes in the cage middle bracket into the chassis. Things I'd do next time are make sure the nuts are central to the holes on the brackets. I'd also make sure the nut that doesn't need a hole drilling into the chassis (Bottom right hole in picture) is fully clear of the sill. This may require the bracket to sit further into the center of the car. I'd also take more time cutting the brackets down so they are a neater fit to the chassis.
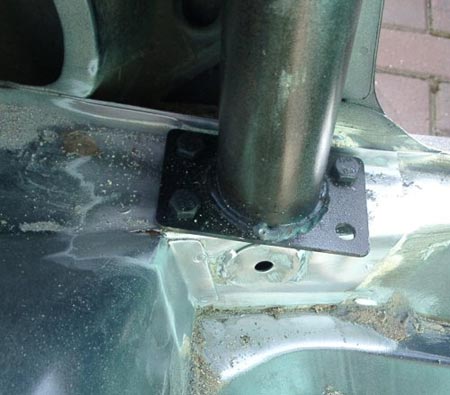
I then set about making sure the brackets fitted the chassis rail. The holes I'd drilled into the chassis were only 8mm, so they had to be enlarged to ensure the nuts would fit in them. I think a 16mm drill would make this easy if you can get your hands on one. However I could only get a 13mm drill so this was used to open the holes up then a circular metal hand file was used to open the holes up as required. This took a considerable amount of time. Again mainly due to the nuts being off center.
Now all I need was a welder, so time to visit me-mate-Dave and fetch his Mig welder.
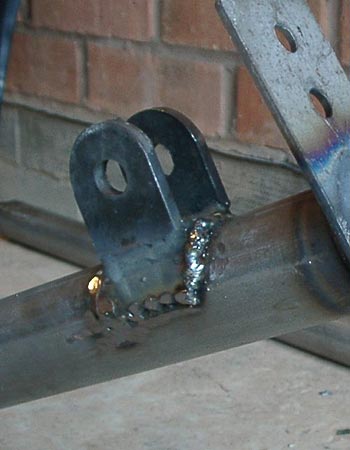
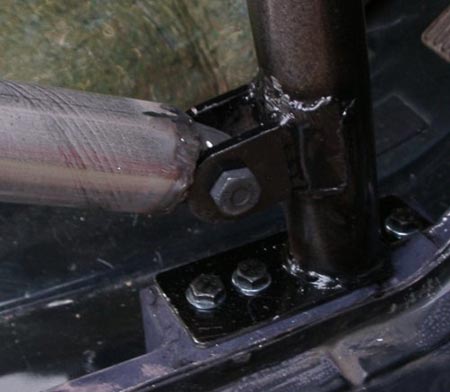
Using CO2 gas I started by welding the door bar brackets to the rear cage. This would be good practice as it's easier to weld thicker metal together. The door bars are optional on this cage so this is why these brackets, which are supplied with the door bars, need to be welded on. This was all done out of the car. The whole cage was assembled out of the car and the brackets positioned as required. The brackets onto rear frame are just under the half way height of the door opening (This was done according to the instructions that came with the door bars). It is important to make sure they line up so there is no twisting of the bracket when the door bar is fitted. The picture below shows one the brackets which has been welded the the front half of the cage. The front brackets are mounted about 50mm from the bottom of the front cage.
I then got a bit braver and welded the middle brackets in place into the car. I'm sure I don't need to say this, but you have to be careful when welded thick metal to thin to prevent blowing holes in the thinner metal. On the whole I was pretty successful at this and I basically welded around the bracket to where ever it met the chassis. I also welded the supporting side bits of metal on the bracket. As I'm still a novice with a welder the results look messy, but it's strong enough from what I can tell (And I've given it a lot of stick to to be sure). Hopefully I'll never get to find out just how strong these welds are.
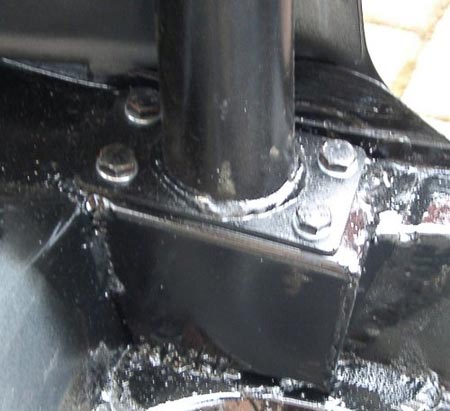
Once both the middle brackets were in place they were treated to liberal coatings of anti-rust spray and Hammerite. Then the rear half of the cage was bolted in without the rear diagonal bar fitted. The rear mountings were bolted in place first with the large washers (Already present on the bolts) fitted underneath the cage and the nuts on top. It proved pretty difficult to get the cage down far enough over the bolts for the nut to be able to grab the thread, so some persuasion from Mr. Hammer was needed on the bracket. Once the nuts had some purchase on the rear bolts the rear diagonal bar was fitted and then the rear bolts tightened down. Then the middle floor mountings were bolted down (Shown below), which was made more difficult by the aforementioned off-centre nuts.
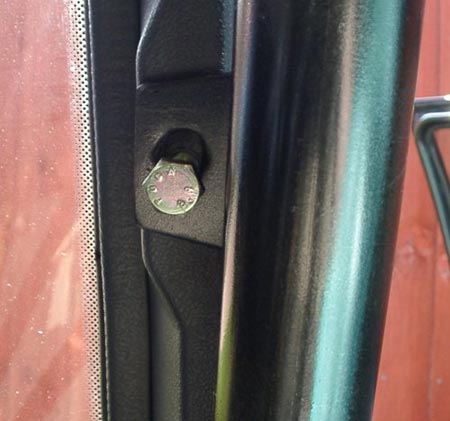
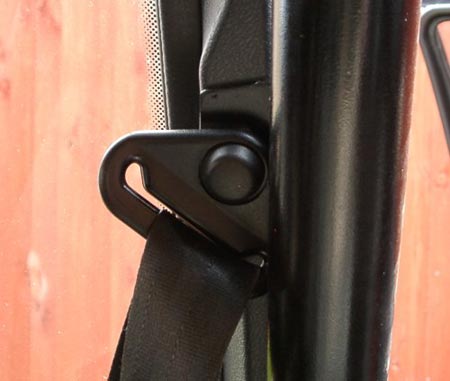
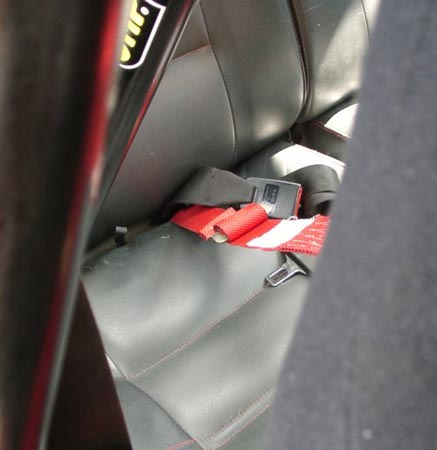
Then with even more brute force persuasion the seatbelt bolts were fitted, including their special spacer washer and the seatbelt mounting itself (See below).
Fitting front part of the cage:
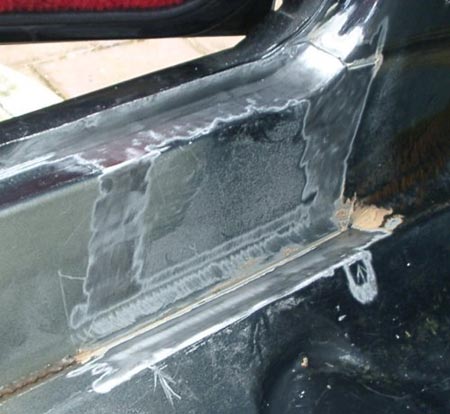
With the rear half of the cage installed it was time to get the front half of the cage in. Another dry fitting of the front cage allowed me to mark up where the brackets needed to be. The front half was removed and the sills were cleaned up for welding. The picture below shows the passenger sill at the front after it had been cleaned up.
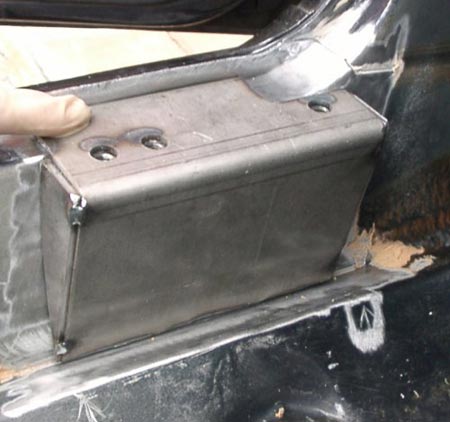
Then a loose fitting of the front bracket shows where about it needs to be welded. The sill does not need to be drilled for the nuts on this bracket to sink into (Thankfully).
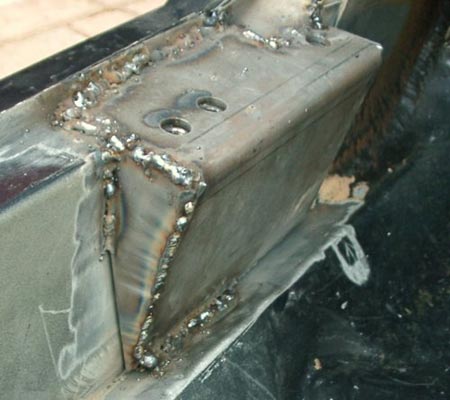
The picture opposite shows part way through welding the front brackets. A bit messy I'll admit but seems secure enough. As with the middle brackets I also additionally welded the supporting side bits of metal on the bracket. Now I'm not sure, but for some reason the mountings for the front half of the cage were sitting forward in my car, so I needed to cut the brackets and the cage mountings back to be able to fit where the sill meets the A-pillar. I think maybe next time If I didn't cut back the brackets or cage and forced the brackets to sit further rearward in the car it would still fit, and clear the dashboard better.
Whilst I was welding these brackets in I was also painting the front half of the cage. This was left overnight to dry.
Also as I'm running in standard class in my championship I had to refit all the trim that I had taken out, so the rear panels, and headlining had to be cut away to fit around the rear cage. The rear panels only need the bottom front edge trimming to fit around the middle bracket mounting. The headlining need to be cut back to meet the cage as it would not fit over the top of it.
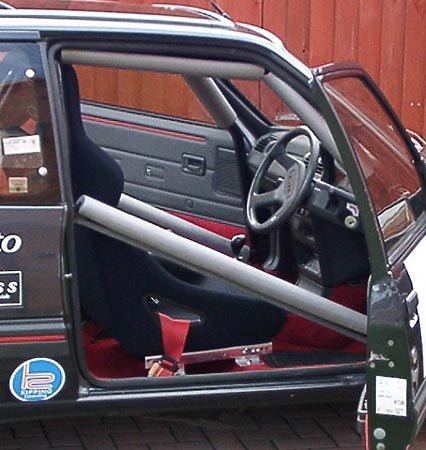
With the front brackets welded in and rust treated as with the middle brackets and the front half of cage painted up, it was now time to install the front half. This took considerable messing about to get the cage in and then into place. Something I don't think I could explain, or for that matter remember.
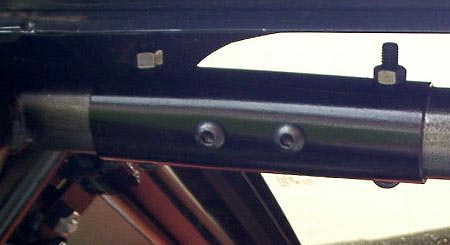
The sleeves that join the 2 halves of the cage together at the top (Shown left) were also painted black. These were fitted onto the front half of the cage while it was being put into place. Due to poor finish on the cage the holes had to be drilled slightly as either the front or rear cross members were twisted out of line. These nuts and bolts were supplied with the cage. I installed them so the nuts and excess thread are top most so I'm less likely to catch them with my head.
The phase 2 dashboard does not need cutting to fit in the front half of the cage. Apparently the phase 1 dashboards need to be cut away on the outside of the heater vents. Maybe because the cage is a bit too far forward, but the cage does pinch my dash slightly, making it awkward to open the glove box.
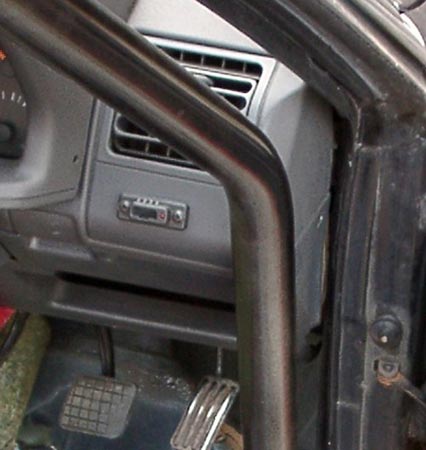
It's also possible to mount the top of the front cage to the roof above the windscreen. However I couldn't see a way of getting any sort of substantial nut and bolt in place without cutting the inner roof metal out. I decided to leave it, and bend the cage brackets as far up out of the way as possible with Mr. Hammer. So effectively this makes my installation an 8 point rollcage.
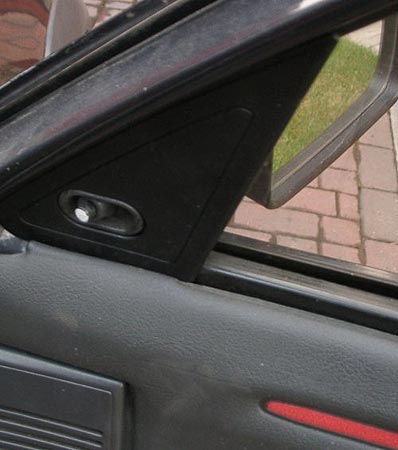
Also the wing mirror adjusters need to be adapted as they foul the front half of the cage. I tried to bend them, but they are cast metal so snapped off. I can still adjust them from inside the car, but it's easier when the window is down.
Fitting door bars:
With the cage pretty much installed there was just the door bars to fit and other final finishing. Holes were drilled in the brackets through to the original hole in the chassis for the front seatbelt floor mounting where the steel rod is located into the chassis. This allows me to keep the seatbelts in so I'm still eligible for the standard class. However I use a 3 point harness instead of the seatbelt anyway.
The door bars are supplied over long (I think they're universal). One end of the door bar is welded all around the bracket to the tube, while the other end is tacked welded. These tack welds were cut off with my lovely angle grinder and then I measured the distance between the bolt hole centers on either side of the cage. Typically there was about 5 or 10 mm difference between each side so each door bars had to be side specific. I cut the door bar down to approximate size and then tried it loose fitting into the brackets and taking a shade off until it fitted properly. Then I welded the door bar end on properly and painted the door bars.
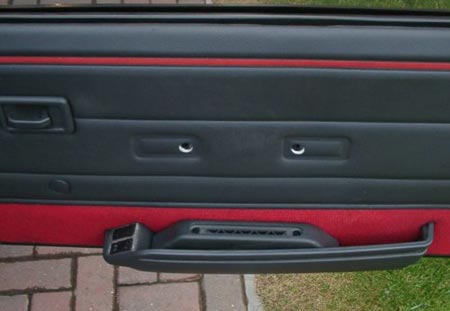
The door handles need to be removed due to the door bars interfering. I intend to replace these with some kind of straps as it's pretty hard to close the doors properly without these.
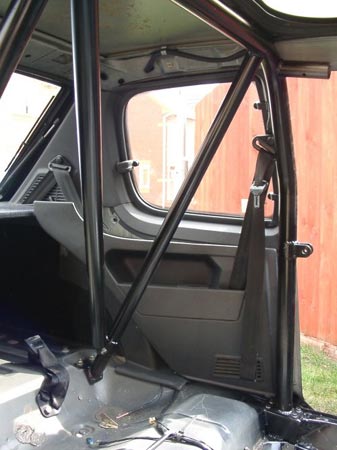
The door bars were bolted in place with again the supplied bolts. The rest of the trim was fitted where possible. With a sunroof there is a drainage tray under the glass which has drainage channels running down the A and C pillars. The rear drainage tubes just clear the cage, but the roof lining had to be cut to make sure it still cleared these tubes (Shown below - drivers side looking back at the drainage tube over the top of the cage).

Refitting interior:
After a good hoovering of the interior of the car of all the dust, welding crap and all other sorts of muck, the rear seat backs were fitted in place with no problems. The carpets, sound deadening and hand brake cover were then reinstalled.
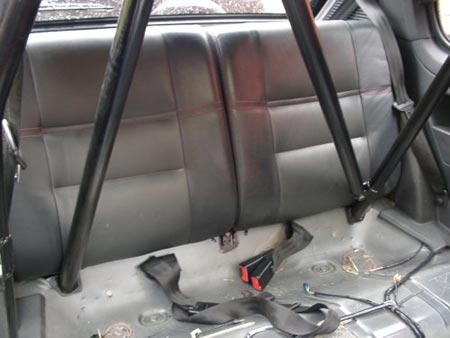
The rear seat squabs fit in place as well. However they need some persuasion. First I fitted them in the upright position then forced them to sit flat down. They are pushed forward by the cage slightly. But it's no problem. Then I refitted the front seats.
Pipe lagging:
With only 1 day left before my next event at Curborough the final touches were added to the car. The cage was touched up with more Hammerite smooth black paint, this time with a paint brush. I initially wanted some Longacre rollcage padding fromDemon Tweeks, but this wasn't going to be available until the next week, which was too late for my event. Plus it was going to cost £40. So a visit to B&Q produced some high density polyurethane pipe lagging.
This can be seen fairly clearly on the door bars, roof bars from front the back and the top half of the front cage in the picture on the right. Why pad the cage? Well I'll be driving the car around to events with no helmet so I don't fancy giving myself concussion by going over a bump, plus if I whacked the cage with my helmet hard enough, I'd have every chance of splitting it.
Final thoughts:
I hope this has been of some use to those who are about to attempt to install this OMP rollcage, or any other cage for that matter. If you have any more questions, want some pictures, or have any comments on this guide then let me know. Thanks also to Bigj and Doof from the 205GTIDrivers Forum, their help with answering my questions was invaluable.
