

Disclaimer:
The procedures on this page are presented as guidelines ONLY. They reflect particular jobs that were done by myself and were written down from memory as a guide to others who might need to do the same procedure. I make no representations as to the accuracy of the information contained here (please remember that I am not a professional mechanic and that free advice is worth every penny). What you do to your car is what YOU do to your car. I take no responsibility for the results of YOUR actions, lack of common sense, or stupidity.
Photos in this guide were taken by cybernck.
Introduction:
The clutch on a 205 does last a good while so you’d usually only have to replace a clutch if it’s been on there for years and is showing signs of wear/slippage or if your going for monster power! Replacing the clutch is something that is fairly easy to do on your driveway with a just a few tools and is largely achievable on your own, though you may need some help with the gearbox removal/refitting (see guide here). Although here I’m replacing the clutch on an Mi16 engine in the 205 the process is identical for the 1.6 or 1.9 engine, the Mi16 clutch is just slightly bigger. The only difference between BE1 and BE3 boxes in clutch terms is the release bearing, the BE3 having a fork mounted bearing (again the Mi16 has a larger bearing and fork).

clutch kit
Tools/Parts Required:
- Clutch Kit (clutch plate, clutch cover, release bearing, grease)
- Clutch Covert Bolts (optional)
- Allan Keys/Sockets
- Clutch Centering Tool (professional route)
- ½" Socket Extension Bar & Insulation Tape (my route!)
Before you start:
This guide deals with just removing and refitting the just the clutch itself, to achieve this you must first fully remove the gearbox from the car. Please refer to the Gearbox Swapping Guide first.
The Job:
1. First job is to remove the clutch that’s currently fitted to the car. To achieve this there are 3 pairs of bolts around the clutch cover. They are usually Allan head bolts though I have seen them with fitted with normal head bolts as well, so which ever you have fitted just remove them. You will then be able to remove the clutch cover and plate from the flywheel, there are a couple of locating dowels on the flywheel so if won’t just fall to the floor, just pull it away from the flywheel.
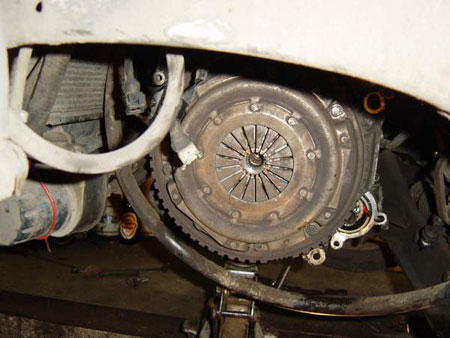
clutch cover plate
2. With the old cover and plate removed this gives you a chance to just check over the condition of the flywheel. A flywheel is essentially like a big brake disc so your looking for a good clean, smooth surface face with no ridging or discolouration. If you have ridges or the flywheel is badly discoloured then you should seek advice as you may need the flywheel skimmed or replaced. If your diff has exploded check the condition of the flywheel very carefully as it can easily be damaged from the flying metal bits!
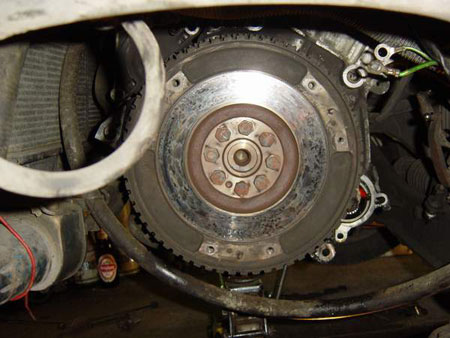
flywheel
3. Assuming your flywheel is fine then it’s a case of fitting the new clutch plate and cover. This is quite a tricky process as you need to ensure the clutch plate is centered correctly so the input shaft on the gearbox will fit.
4. To center the clutch plate first loosely bolt up the clutch plate and the clutch cover. Don’t go too tight as the clutch cover pushes the plate onto the flywheel and you won’t be able to move it! With the plate held on loosely by the cover either use a clutch centering tool if you have one (sometimes they are supplied with the clutch kit) or try my method of getting a ½" socket extension bar and some electrical insulation tape. Use the tape to wrap around the end of the extension bar until it fits snugly in the center of the clutch plate and the hole in the end of the crank. You should then be able to gently move the plate until it is centered. NOTE: this may be a trial and error time here so be patient and you’ll get it right eventually.
5. If you are fortunate enough to be replacing the clutch with the engine out of the car then at this point you can offer up the gearbox to check the clutch is centered correctly. If your doing this with the engine in the car then get it as spot on as you can by eye and be prepared for some firm heaving with the gearbox later on!
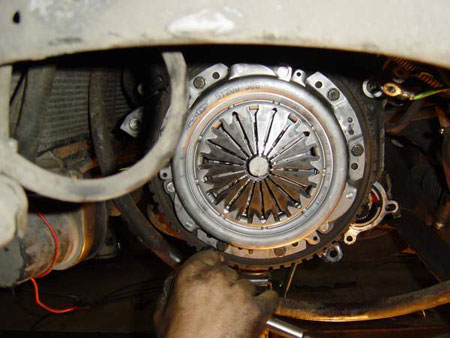
fitting new clutch cover plate
6. Once you’re happy it’s centered finish off tightening the clutch cover bolts down. Although I don’t believe there is any order to these I tend to do the bolt opposite the one I’ve just done next, just to be on the safe side. Worth pointing out that it’s fine to reuse the clutch cover bolts, though if you want total peace of mind then get some new ones from Peugeot before starting the job. New bolts have threadlock on them so it may be worth re-applying some to old bolts.
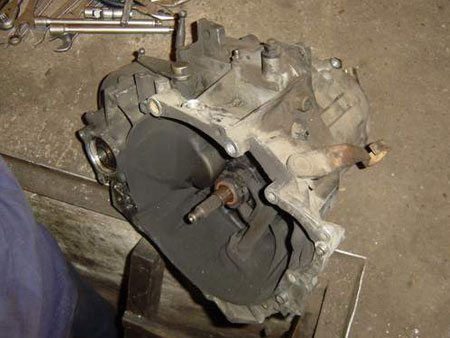
release bearing fitted to input shaft and selection fork
7. With the plate and cover now on the flywheel turn your attention to the release bearing. This is found on the input shaft in the gearbox. Sometimes the bearing falls out of the gearbox on removing the ‘box from the car. Not to panic as the bearing only goes on one way. If it’s still there then remove the old bearing from the shaft. With most clutch kits you get a small packet of grease, this is for the input shaft where the bearing slides along it. DON’T put it on the splined end, it’s just not needed there!
8. BE1: With the shaft greased in the right area, re-fit the release bearing. Its obvious how it goes back on! BE3: With the shaft greased in the right area re-fit the new release bearing to the clutch fork. This will only work one way and is a little fiddly to get on but you’ll see the right way as soon as it’s there. The 2 forks need to slide into the little cutout sections on the side of the bearing, this is essentially how the clutch works so make sure you get this right! If it falls off it with the gearbox on the car, can be re-aligned through a hole in the bottom of the gearbox.
9. When your happy the bearing is fitted correctly your done with fitting the new clutch, just refer back to the Gearbox Swapping Guide guide to fit the gearbox back to the car. When it comes to re-attaching the clutch cable you may need to wind the nut and big washer back as there will be more material on the clutch plate and therefore the bite point will have moved.
10. There is no 'running in' period for a new clutch, just use the car as normal!